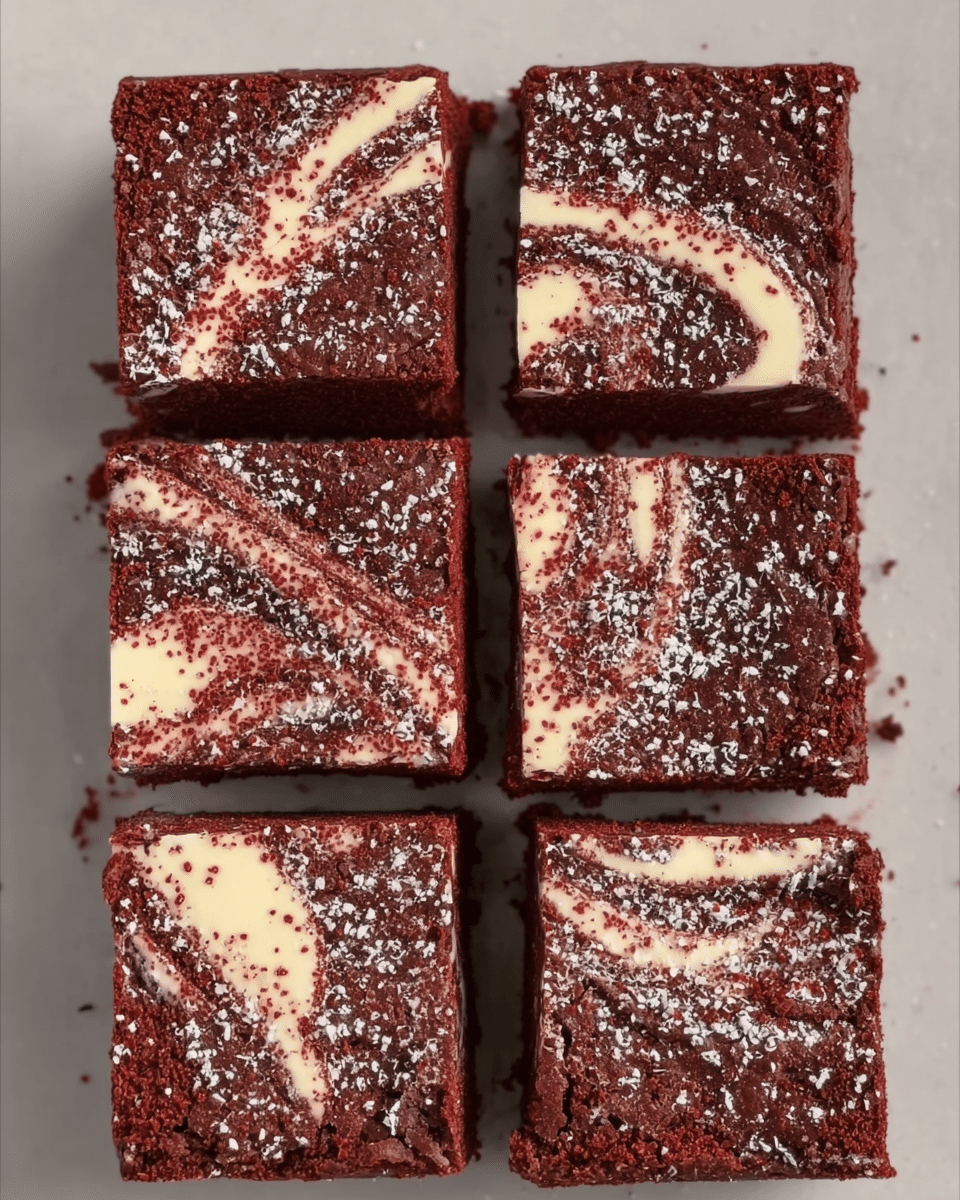
Are you tired of the same old brownies that lack that special wow factor? Red velvet brownies are here to transform your dessert game with their stunning appearance and irresistible taste. These vibrant treats combine the richness of chocolate with a gorgeous crimson color that makes them absolutely unforgettable.
Hi, I’m Lucas Bennett, the heart behind Foodydish! As someone who believes desserts should be both a feast for the eyes and the palate, I’ve perfected these red velvet brownies through countless kitchen experiments. The first time I served these at a family gathering, they disappeared within minutes and now they’re requested at every celebration.
In this guide, I’ll walk you through five incredible variations of red velvet brownies, covering everything from ingredient selection to baking techniques that guarantee success. You’ll discover how to achieve that perfect fudgy texture, create stunning layers, and customize these treats for any occasion.
Why These Red Velvet Brownies Work
- Uses pantry staples with just a few specialty ingredients for that authentic red velvet flavor
- Quick 15-minute prep time with impressive results every time
- Versatile recipe perfect for Valentine’s Day, holiday parties, or everyday indulgence
- Balances sweet and tangy flavors for a more sophisticated brownie experience
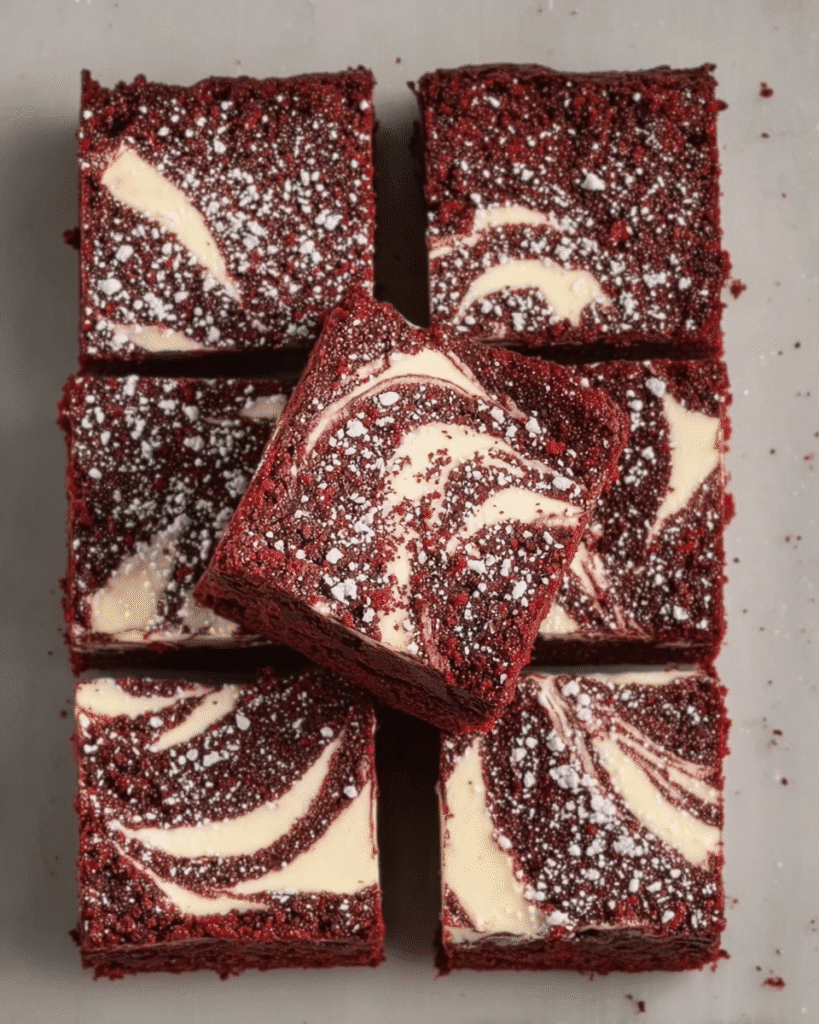
- Creates Instagram-worthy desserts with minimal effort
Choosing the Right Ingredients for Red Velvet Brownies
Best Chocolate for Red Velvet Brownies
The chocolate in red velvet brownies provides a subtle backdrop rather than an overwhelming flavor. For authentic results, use natural unsweetened cocoa powder (not Dutch-processed) as it reacts better with the vinegar and buttermilk to create that signature red velvet tang. For chocolate chips or chunks, semi-sweet varieties complement the red velvet flavor profile without overpowering it.
Food Coloring Options for Red Velvet Brownies
Traditional red velvet brownies require food coloring for their signature hue. Gel food coloring produces the most vibrant results with minimal liquid added to your batter. For those seeking natural alternatives, beetroot powder can provide a more subtle red tone while adding nutritional benefits. Start with 1-2 tablespoons and adjust based on your color preference.
Flour and Leavening for Perfect Red Velvet Brownies
All-purpose flour works beautifully in these brownies, but for an even more tender texture, you can substitute cake flour. The balance of baking powder and baking soda is crucial they work together with the acidic ingredients to create that distinctive red velvet texture that falls between cake and brownie.
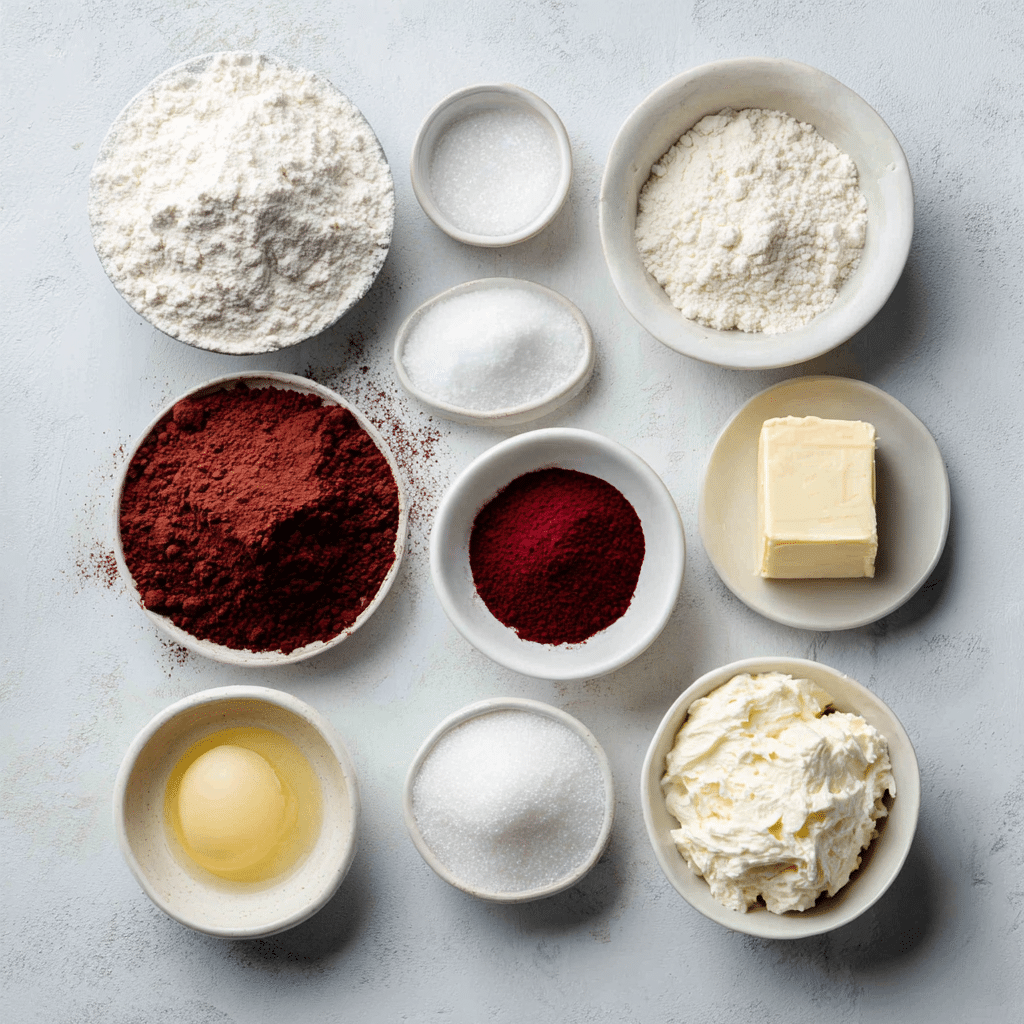
Ingredients & Prep for Red Velvet Brownies
Brownie Base Essentials
- 1 cup unsalted butter
- 2 cups granulated sugar
- 4 large eggs
- 2 teaspoons vanilla extract
- 1/3 cup unsweetened cocoa powder
- 2-3 tablespoons red food coloring (gel preferred)
- 2 cups all-purpose flour
- 1 teaspoon baking powder
- 1/2 teaspoon salt
- 1 tablespoon white vinegar
- 1/2 cup buttermilk
Cream Cheese Frosting Ingredients
- 8 oz cream cheese (room temperature)
- 1/4 cup unsalted butter (room temperature)
- 2 cups powdered sugar
- 1 teaspoon vanilla extract
- Pinch of salt
Pantry Staples and Mix-ins
For your red velvet brownie variations, keep these mix-ins on hand:
- White chocolate chips
- Cream cheese swirl components
- Chopped nuts (walnuts or pecans work beautifully)
- Freeze-dried berries for natural color and flavor
- Decorative sprinkles for festive occasions
Step-by-Step Red Velvet Brownies Cooking Instructions
Pre-Cooking Red Velvet Brownie Prep
- Preheat your oven to 350°F (175°C) and line a 9×13 inch baking pan with parchment paper, leaving overhang for easy removal.
- Allow refrigerated ingredients like eggs, butter, and cream cheese to come to room temperature for at least 30 minutes.
- Sift together dry ingredients (flour, cocoa powder, salt, baking powder) to prevent lumps in your brownie batter.
- Prepare any mix-ins by measuring and chopping as needed before starting the mixing process.
Mixing Red Velvet Brownie Batter
- In a large bowl, cream together butter and sugar until light and fluffy (about 3-4 minutes).
- Add eggs one at a time, beating well after each addition.
- Mix in vanilla extract, cocoa powder, and red food coloring until completely incorporated.
- In a small bowl, combine vinegar and buttermilk, then add to the batter alternately with the dry ingredients, mixing just until combined.
- Fold in any specialty mix-ins for your chosen variation (chocolate chips, nuts, etc.).
Baking Red Velvet Brownies
- Pour batter into prepared pan and spread evenly with a spatula.
- For swirled variations, dollop cream cheese mixture over the top and create swirls using a knife or toothpick.
- Bake for 25-30 minutes, or until a toothpick inserted in the center comes out with a few moist crumbs (not wet batter).
- Allow to cool completely in the pan before frosting or cutting.
Frosting Red Velvet Brownies
- Beat cream cheese and butter until smooth and fluffy (about 2-3 minutes).
- Gradually add powdered sugar, vanilla, and salt, beating until smooth.
- Spread over cooled brownies or pipe decoratively for a more elegant presentation.
- Refrigerate for 30 minutes before cutting for the cleanest edges.
Pro Tips for Perfect Red Velvet Brownies
Achieving the Perfect Red Velvet Color
For that vibrant red color without an artificial taste, mix your food coloring with the cocoa powder and a small amount of water to create a paste before adding to your batter. This helps distribute the color evenly and intensifies the hue. If using natural coloring like beetroot powder, add it to the dry ingredients for better incorporation.
Texture Troubleshooting for Red Velvet Brownies
Too cakey? Reduce the flour by 2 tablespoons and add an extra egg yolk. For fudgier brownies, underbake slightly by removing from the oven when the center is still slightly jiggly. The residual heat will continue cooking them to perfection. Always use room temperature ingredients for the most even texture.
Storage and Make-Ahead Options
Unfrosted brownies can be wrapped tightly and frozen for up to 3 months. For frosted varieties, refrigerate in an airtight container for up to 5 days. Always bring chilled brownies to room temperature before serving for the best flavor and texture.
Looking for more brownie inspiration? Check out my collection of delectable desserts on Pinterest where I share new treat ideas every week!
5 Decadent Red Velvet Brownie Variations
1. Classic Cream Cheese Swirl Red Velvet Brownies
The perfect marriage of tangy cream cheese and rich red velvet creates a striking marbled effect. Prepare the base brownie batter, then dollop a mixture of 8 oz cream cheese, 1/4 cup sugar, 1 egg, and 1/2 teaspoon vanilla on top. Use a knife to create beautiful swirls before baking.
2. White Chocolate Chunk Red Velvet Brownies
White chocolate adds sweet pockets of creamy goodness throughout these brownies. Fold 1 cup of premium white chocolate chunks into your batter before baking, then sprinkle another 1/4 cup on top during the last 5 minutes of baking for a stunning visual effect.
3. Cheesecake-Topped Red Velvet Brownies
Create a striking layered dessert by baking the red velvet base for 15 minutes, then topping with a cheesecake layer (16 oz cream cheese, 1/2 cup sugar, 2 eggs, 1 teaspoon vanilla) and returning to the oven for 20 more minutes. Chill thoroughly before cutting.
4. Raspberry Red Velvet Brownies
Fresh or freeze-dried raspberries complement the chocolate notes in red velvet beautifully. Fold 1 cup of fresh raspberries into your batter or create a raspberry swirl by heating 1/2 cup raspberry jam and dolloping it over the batter before swirling.
5. Triple Chocolate Red Velvet Brownies
For extreme chocolate lovers, this variation incorporates dark, milk, and white chocolate chips (1/3 cup of each) into the batter, then tops the baked brownies with a rich chocolate ganache (1 cup chocolate chips melted with 1/2 cup heavy cream).
| Variation | Special Ingredients | Baking Time | Difficulty Level |
|---|---|---|---|
| Classic Cream Cheese Swirl | Cream cheese, extra egg | 30-32 min | Beginner |
| White Chocolate Chunk | Premium white chocolate | 28-30 min | Beginner |
| Cheesecake-Topped | Additional cream cheese layer | 35-40 min | Intermediate |
| Raspberry | Fresh/freeze-dried raspberries | 30-32 min | Beginner |
| Triple Chocolate | Three chocolate varieties, heavy cream | 28-30 min + cooling time for ganache | Intermediate |
Serving Suggestions for Red Velvet Brownies
Elevate your red velvet brownies with creative serving ideas that make them even more special:
- Dust with powdered sugar or cocoa powder through a stencil for an elegant presentation
- Add a scoop of vanilla bean ice cream and a drizzle of chocolate sauce for a deluxe dessert
- Pair with fresh berries and a mint garnish for color contrast and fresh flavor
- Serve alongside coffee with hazelnut or caramel notes to complement the chocolate undertones
- For special occasions, place a brownie square in a pool of raspberry coulis with a dollop of mascarpone
FAQs About Red Velvet Brownies
Can I make red velvet brownies without food coloring?
Yes! You can skip the food coloring entirely for a lightly brown “velvet” brownie that still has the distinctive flavor. Alternatively, use 2-3 tablespoons of beetroot powder for a natural red tint.
Why did my red velvet brownies turn out too dry?
Overbaking is the most common culprit. Remember that brownies continue to cook slightly after removal from the oven. For fudgy results, take them out when a toothpick comes out with a few moist crumbs.
Can I make red velvet brownies gluten-free?
Absolutely! Substitute a 1:1 gluten-free flour blend. Add 1/4 teaspoon xanthan gum if your blend doesn’t already include it for the best texture.
How do I get clean cuts on my red velvet brownies?
Refrigerate frosted brownies for 30 minutes, then use a sharp knife dipped in hot water and wiped clean between each cut.
Conclusion
These five decadent red velvet brownie variations are just the beginning of your culinary adventure with this stunning dessert. Whether you’re baking for a special occasion or simply craving something extraordinary, these recipes deliver both impressive visual appeal and incredible flavor.
Remember that the best red velvet brownies balance chocolate, tanginess, and sweetness while maintaining that perfect fudgy-yet-tender texture. Don’t be afraid to experiment with your own twist once you’ve mastered the basics!
Ready to impress? Preheat your oven and dive into these red velvet brownies that have won over thousands of Foodydish readers.
Print
Red Velvet Brownies: 5 Decadent Ways to Indulge Your Sweet Tooth
- Total Time: 35 mins
- Yield: 9 brownies 1x
- Diet: Vegetarian
Description
Fudgy, rich red velvet brownies with a vibrant color, subtle cocoa flavor, and ultra-moist texture perfect on their own or topped with cream cheese frosting.
Ingredients
1/2 cup unsalted butter, melted
1 cup granulated sugar
2 large eggs
1 tsp vanilla extract
1 tbsp red food coloring
1 tbsp cocoa powder
3/4 cup all-purpose flour
1/4 tsp salt
1/2 cup white chocolate chips (optional)
Instructions
1. Preheat oven to 350°F (175°C) and line an 8×8-inch baking pan with parchment paper.
2. In a bowl, whisk melted butter and sugar until combined.
3. Add eggs, vanilla extract, and red food coloring; mix well.
4. Stir in cocoa powder, flour, and salt until just combined.
5. Fold in white chocolate chips if using.
6. Pour batter into prepared pan and spread evenly.
7. Bake for 22–25 minutes until edges are set and center is slightly fudgy.
8. Cool completely before slicing and serving.
Notes
Do not overbake to maintain a fudgy texture.
Cream cheese frosting makes a delicious topping for extra indulgence.
Store brownies in an airtight container at room temperature for up to 3 days.
- Prep Time: 10 mins
- Cook Time: 25 mins
- Category: Dessert
- Method: Baking
- Cuisine: American
Nutrition
- Serving Size: 1 brownie
- Calories: 260
- Sugar: 22g
- Sodium: 120mg
- Fat: 14g
- Saturated Fat: 8g
- Unsaturated Fat: 6g
- Trans Fat: 0g
- Carbohydrates: 30g
- Fiber: 1g
- Protein: 3g
- Cholesterol: 55mg
Keywords: red velvet brownies, fudgy brownies, cocoa brownies, easy dessert