
Chocolate-covered strawberry mummies have become my favorite Halloween creation, and it all started with a last-minute party panic three years ago. I’m Michael, a passionate culinary artist at FoodyDish.com, and I remember frantically searching for a dessert that would wow guests without keeping me in the kitchen for hours. That’s when inspiration struck what if I could transform the elegant simplicity of chocolate-covered strawberries into something spooky and fun?
As someone who thrives on reimagining traditional dishes, I experimented with drizzling techniques until I perfected these adorable mummy treats. The result? A recipe that’s become a Halloween staple for thousands of home cooks in our FoodyDish.com community. These chocolate-covered strawberry mummies are not only visually stunning but also incredibly simple to make, requiring just 30 minutes from start to finish.
What makes this recipe truly special is its versatility. Whether you’re hosting a Halloween bash, preparing treats for trick-or-treaters, or simply want to add some festive flair to your dessert table, these mummies deliver. In this guide, I’ll walk you through selecting the perfect strawberries, mastering the chocolate drizzle technique, and creating professional-looking results that’ll have everyone asking for your secret. We’ll also explore flavor variations, storage tips, and answer common questions to ensure your chocolate-covered strawberry mummies turn out perfectly every time.
Why This Chocolate-Covered Strawberry Mummies Recipe Works
Creating memorable chocolate-covered strawberry mummies doesn’t require professional pastry skills or expensive ingredients. Here’s why this recipe has captured the hearts of home cooks everywhere:
- Minimal ingredients, maximum impact: Using just four simple components strawberries, semi-sweet chocolate, white chocolate, and candy eyes you’ll create treats that look like they came from a specialty bakery
- Quick preparation for busy schedules: With only 15 minutes of active prep time and 15 minutes of chilling, these mummies are perfect for last-minute party preparations or spontaneous Halloween celebrations
- Kid-friendly and interactive: Children love helping with the white chocolate drizzling and placing the candy eyes, making this an ideal family activity that keeps little hands busy
- Crowd-pleasing appeal: The combination of fresh fruit and chocolate satisfies both health-conscious guests and dessert lovers, offering a lighter alternative to heavy Halloween candies
- Impressive presentation: These chocolate-covered strawberry mummies photograph beautifully, making them Instagram-worthy additions to your Halloween spread
Choosing the Right Strawberries for Chocolate-Covered Strawberry Mummies
The foundation of exceptional chocolate-covered strawberry mummies lies in selecting quality fruit. Here’s everything you need to know about choosing the perfect berries.
Best Strawberries for This Recipe
Medium to large strawberries work best for chocolate-covered strawberry mummies because they provide ample surface area for the mummy bandage effect. Look for berries with bright red color, firm texture, and fresh green stems still attached. The stem serves as a natural handle during the dipping process, making the entire procedure cleaner and easier.
Avoid strawberries with soft spots, bruising, or signs of mold. The fruit should feel heavy for its size, indicating juiciness and freshness. During peak strawberry season (typically spring and early summer), you’ll find the sweetest, most flavorful options at farmers’ markets or local produce stands.
Buying Tips for Perfect Berries
When shopping for ingredients for your chocolate-covered strawberry mummies, inspect the container carefully. Strawberries should have a sweet, fragrant aroma if there’s no scent, the berries likely lack flavor. Check the bottom of the container for moisture or crushed berries, which indicate the batch may be past its prime.
If possible, buy strawberries the day you plan to make your chocolate-covered strawberry mummies. Fresh berries ensure the best texture and prevent moisture issues that can cause chocolate to seize or slide off during preparation.
Preparation Essentials
Properly preparing strawberries is crucial for chocolate-covered strawberry mummies success. Wash berries gently under cool water and pat them completely dry with paper towels. Any residual moisture will prevent chocolate from adhering properly and can cause the coating to become grainy or separate.
Allow washed strawberries to air dry for 30 minutes at room temperature before beginning the chocolate-dipping process. This extra step ensures a smooth, professional finish on your chocolate-covered strawberry mummies.
Ingredients & Prep for Chocolate-Covered Strawberry Mummies
Gathering your ingredients and preparing your workspace properly sets the stage for flawless chocolate-covered strawberry mummies.
Essential Ingredients List
- 12–16 fresh strawberries, washed and thoroughly dried
- 1 cup (175 g) semi-sweet chocolate chips
- ¼ cup (40 g) white chocolate chips
- Candy eyes (available in baking aisles or online)
Chocolate Selection and Preparation
Quality chocolate makes all the difference in chocolate-covered strawberry mummies. Semi-sweet chocolate provides the perfect balance of sweetness and cocoa intensity, complementing the natural tartness of strawberries. For those who prefer sweeter treats, milk chocolate works beautifully as a substitute.
White chocolate serves as the “bandage” wrapping for your chocolate-covered strawberry mummies. Choose high-quality white chocolate chips that contain cocoa butter rather than palm oil substitutes. Real white chocolate melts more smoothly and creates cleaner, more professional-looking drizzle lines.
Workspace Setup
Line a baking sheet with parchment paper before beginning. This prevents chocolate-covered strawberry mummies from sticking and makes cleanup effortless. Prepare a small piping bag or zip-top bag for the white chocolate drizzle, and have your candy eyes within easy reach for quick assembly while the chocolate is still tacky.
Step-by-Step Cooking Instructions for Chocolate-Covered Strawberry Mummies
Follow these detailed instructions to create picture-perfect chocolate-covered strawberry mummies every time.
Pre-Cooking Prep for Chocolate-Covered Strawberry Mummies
Ensure all strawberries are completely dry and at room temperature. Cold berries cause chocolate to harden too quickly, creating a thick, uneven coating. Set up your workspace with all ingredients measured and tools ready. This mise en place approach prevents scrambling mid-process and ensures smooth execution.
Cooking Method for Chocolate-Covered Strawberry Mummies
Place semi-sweet chocolate chips in a microwave-safe bowl. Microwave in 15-second intervals, stirring thoroughly between each heating session. This gradual melting prevents chocolate from burning or seizing. The chocolate should reach a smooth, glossy consistency that easily coats the back of a spoon.
Hold each strawberry by the stem and dip it into the melted chocolate, covering approximately three-quarters of the berry. Allow excess chocolate to drip back into the bowl, then place the coated strawberry on your prepared parchment-lined tray. Repeat until all strawberries are dipped.
Creating the Mummy Effect for Chocolate-Covered Strawberry Mummies
Melt white chocolate chips using the same method as before. Transfer melted white chocolate to a small piping bag or zip-top bag with a tiny corner snipped off about 1/8 inch in diameter works perfectly.
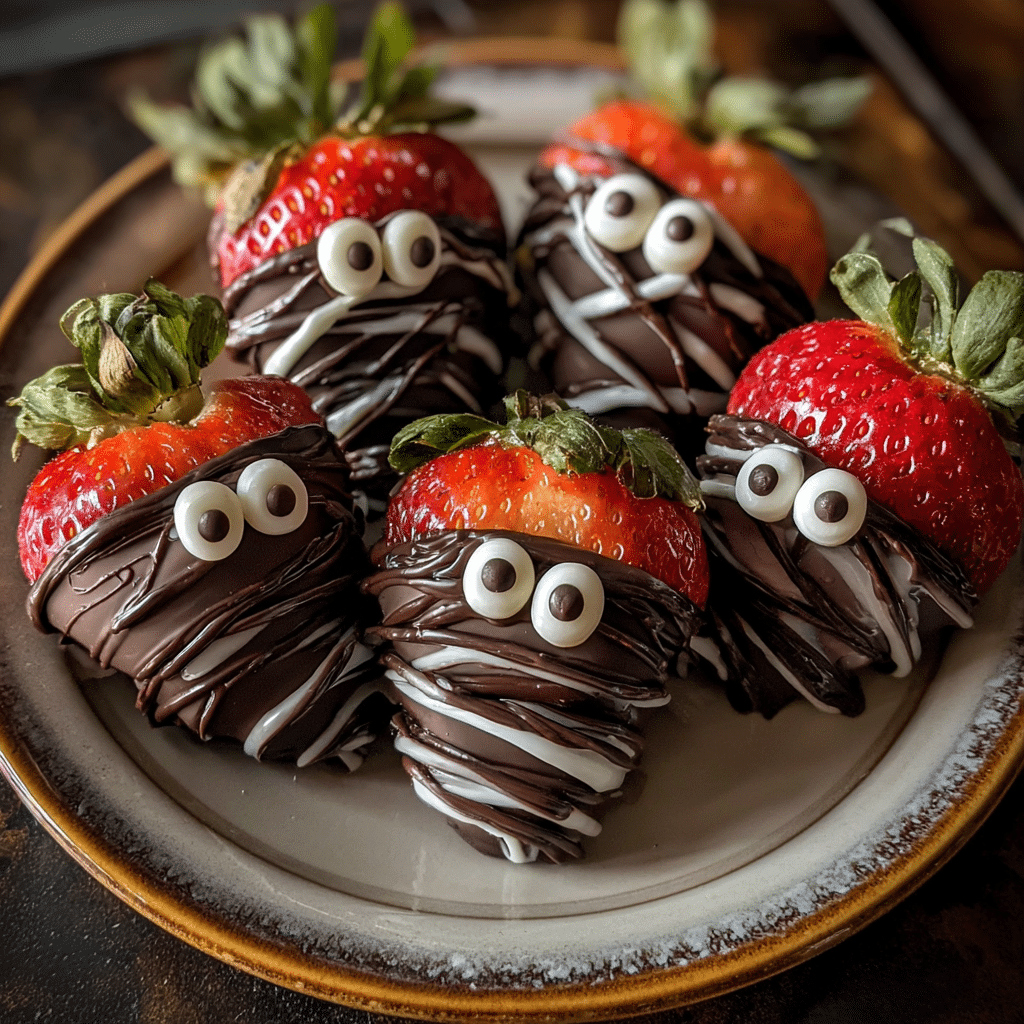
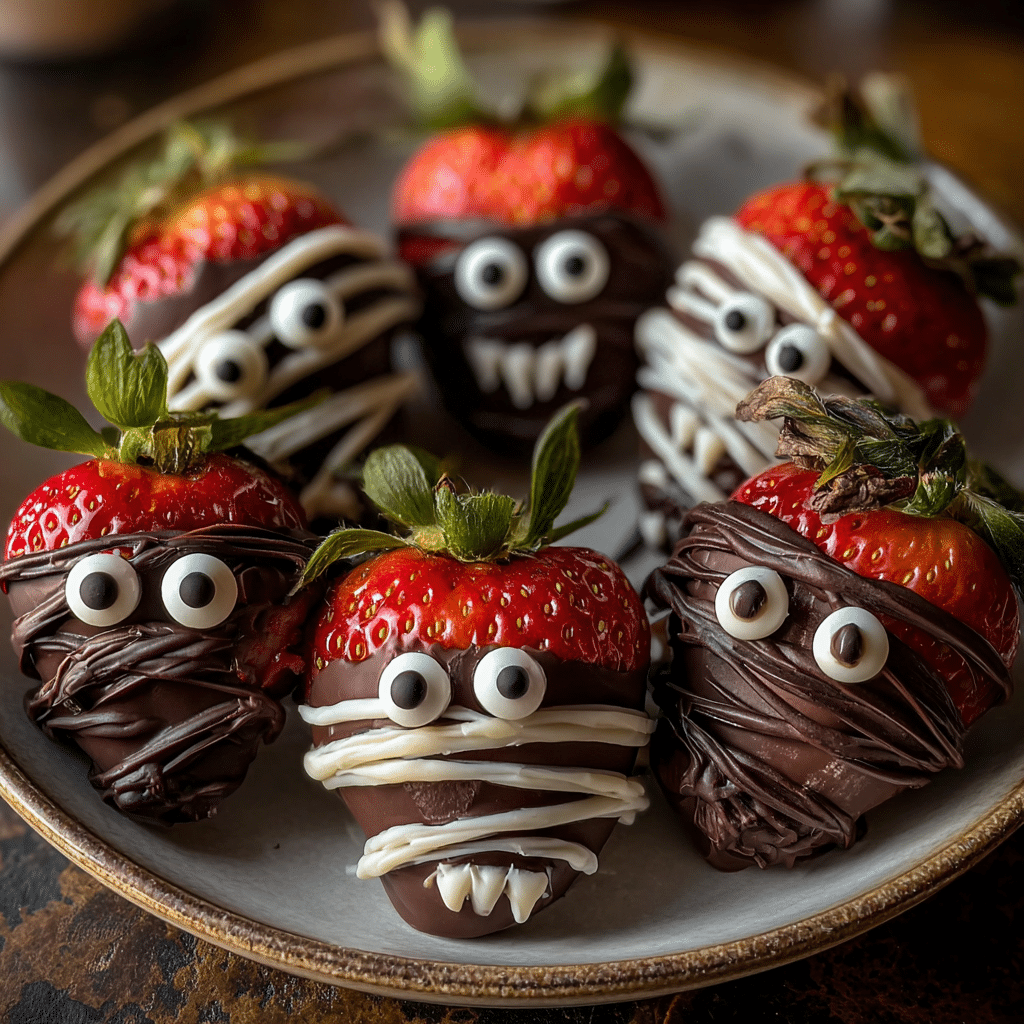
Drizzle white chocolate horizontally and diagonally across each strawberry, creating the iconic mummy bandage appearance. Don’t worry about perfection; irregular wrapping adds character and authenticity to your chocolate-covered strawberry mummies. Leave a small gap near the top for the eyes.
Final Assembly for Chocolate-Covered Strawberry Mummies
Before the white chocolate sets, gently press two candy eyes onto each strawberry in the exposed gap. The slightly tacky white chocolate acts as edible glue, securing the eyes in place.
Resting Your Chocolate-Covered Strawberry Mummies
Refrigerate the completed chocolate-covered strawberry mummies for 10 to 15 minutes, allowing both chocolate layers to set completely. This chilling time ensures clean handling and prevents smudging when transferring to serving platters.
Pro Tips for Perfect Chocolate-Covered Strawberry Mummies
Elevate your chocolate-covered strawberry mummies with these expert techniques I’ve developed through years of recipe testing.
Avoiding Common Mistakes with Chocolate-Covered Strawberry Mummies
Never rush the drying process after washing strawberries. Moisture is the enemy of smooth chocolate coating. If chocolate seems too thick, add a teaspoon of coconut oil or vegetable shortening to thin it slightly. Avoid adding water or milk, which causes chocolate to seize and become grainy.
Work in a cool environment when making chocolate-covered strawberry mummies. High humidity or warm temperatures can prevent chocolate from setting properly, resulting in fingerprints and smudges.
Tool Recommendations
A quality piping bag gives you precise control over white chocolate drizzle patterns. For beginners, disposable zip-top bags work perfectly. Small offset spatulas help clean up drips and create professional edges on your chocolate-covered strawberry mummies.
Storage & Reheating Guidelines
Store chocolate-covered strawberry mummies in the refrigerator in a single layer, loosely covered with plastic wrap. They taste best within 24 hours but can last up to two days. The strawberries will release moisture over time, potentially causing the chocolate coating to weep, so plan to serve them soon after preparation.
Flavor Variations for Chocolate-Covered Strawberry Mummies
Customize your chocolate-covered strawberry mummies to suit different tastes and dietary preferences.
Dark Chocolate Twist
Swap semi-sweet chocolate for dark chocolate (70% cacao or higher) to create sophisticated chocolate-covered strawberry mummies with deeper, more intense flavor. This variation appeals to adults and reduces overall sugar content.
Allergy-Friendly Options
For guests with dairy allergies, use dairy-free chocolate chips and white chocolate alternatives. Many brands now offer excellent vegan options that melt and taste virtually identical to traditional chocolate, ensuring everyone can enjoy your chocolate-covered strawberry mummies.
Global Flavor Inspirations
| Variation | Chocolate Type | Special Addition | Flavor Profile |
|---|---|---|---|
| Mexican Spice | Dark chocolate | Cayenne pepper, cinnamon | Sweet heat with warmth |
| Mint Delight | Semi-sweet chocolate | Peppermint extract | Refreshing, cool |
| Salted Caramel | Milk chocolate | Sea salt, caramel drizzle | Sweet and salty |
| Espresso Elegance | Dark chocolate | Instant espresso powder | Rich, sophisticated |
Serving Suggestions for Chocolate-Covered Strawberry Mummies
Present your chocolate-covered strawberry mummies with style and complementary pairings.
Arrange these treats on a black or orange platter to enhance the Halloween theme. Surround them with plastic spiders, fake cobwebs, or autumn leaves for dramatic presentation. Serve alongside hot apple cider, pumpkin spice lattes, or sparkling grape juice for a complete festive experience.
For adult gatherings, pair chocolate-covered strawberry mummies with dessert wines like Port or Moscato, which complement the chocolate’s richness without overwhelming the strawberry’s brightness.
FAQs About Chocolate-Covered Strawberry Mummies
Can I use frozen strawberries for chocolate-covered strawberry mummies?
Fresh strawberries work best for this recipe. Frozen berries release too much moisture when thawed, preventing chocolate from adhering properly and creating a soggy texture.
How do I fix chocolate that’s too thick?
Add coconut oil or vegetable shortening one teaspoon at a time, stirring until you achieve the desired consistency for dipping your chocolate-covered strawberry mummies.
Are chocolate-covered strawberry mummies safe for pregnant women?
Yes, when made with properly washed strawberries and quality chocolate, these treats are perfectly safe during pregnancy.
Can I make these ahead of time?
Chocolate-covered strawberry mummies taste best when fresh but can be made up to 24 hours ahead. Store them refrigerated and serve within two days for optimal quality.
Conclusion
These spooky chocolate-covered strawberry mummies prove that impressive Halloween treats don’t require hours in the kitchen or professional culinary training. With just 30 minutes and four simple ingredients, you’ll create memorable desserts that delight guests of all ages.
Fire up your creativity and try making these chocolate-covered strawberry mummies tonight! Join the 5,000+ home cooks in our FoodyDish.com community who’ve fallen in love with this recipe. Share your creations with us on social media using #FoodyDishHalloween I personally love seeing your unique twists and presentations.
Ready for more festive inspiration? Try our Skellington Cheese Ball Appetizer or browse our complete collection of Easy Holiday Desserts for year-round celebration ideas. Let’s continue turning everyday ingredients into extraordinary experiences together!
you loved this recipe, don’t forget to share it with your friends or save it to try later!
I’d be thrilled to see your personal touch share your photos on If Pinterest
Print
Spooky Chocolate-Covered Strawberry Mummies: A Hauntingly Delicious Halloween Treat
- Total Time: 30 mins
- Yield: 12–16 strawberries 1x
Description
These Spooky Chocolate-Covered Strawberry Mummies are a fun and easy Halloween treat! Juicy strawberries are dipped in smooth chocolate, drizzled with white chocolate ‘bandages,’ and decorated with candy eyes for a cute, spooky bite everyone will love.
Ingredients
12–16 fresh strawberries, washed and dried
1 cup (175 g) semi-sweet chocolate chips
¼ cup (40 g) white chocolate chips
Candy eyes (available in baking aisles or online)
Instructions
1. Melt the semi-sweet chocolate chips in a microwave-safe bowl in 15-second intervals, stirring until smooth.
2. Hold each strawberry by the stem and dip it into the melted chocolate, covering about ¾ of the berry.
3. Place dipped strawberries on a parchment-lined tray.
4. Melt white chocolate chips and place them in a small piping bag or zip-top bag with a tiny corner snipped.
5. Drizzle the white chocolate horizontally and diagonally across the strawberries to create a mummy wrap effect.
6. Before the white chocolate sets, press two candy eyes onto each strawberry to create the mummy face.
7. Refrigerate for 10–15 minutes to allow the chocolate to set completely.
8. Arrange on a platter and enjoy your spooky, sweet, and easy Halloween treat!
Notes
Tips:
– Make sure the strawberries are completely dry before dipping so the chocolate sticks properly.
– You can use milk or dark chocolate instead of semi-sweet.
– Store in the fridge for up to 24 hours before serving.
– Add a touch of edible gold dust for a magical Halloween shimmer!
- Prep Time: 15 mins
- Cook Time: 0 mins
- Category: Dessert, Halloween Treats
- Method: No-Bake
- Cuisine: American
Nutrition
- Serving Size: 1 strawberry
- Calories: 80
- Sugar: 8g
- Sodium: 5mg
- Fat: 5g
- Saturated Fat: 3g
- Unsaturated Fat: 2g
- Trans Fat: 0g
- Carbohydrates: 9g
- Fiber: 1g
- Protein: 1g
- Cholesterol: 0mg
Keywords: Spooky Chocolate Strawberries, Halloween Mummies, Chocolate Covered Strawberries, Halloween Dessert