why make this recipe
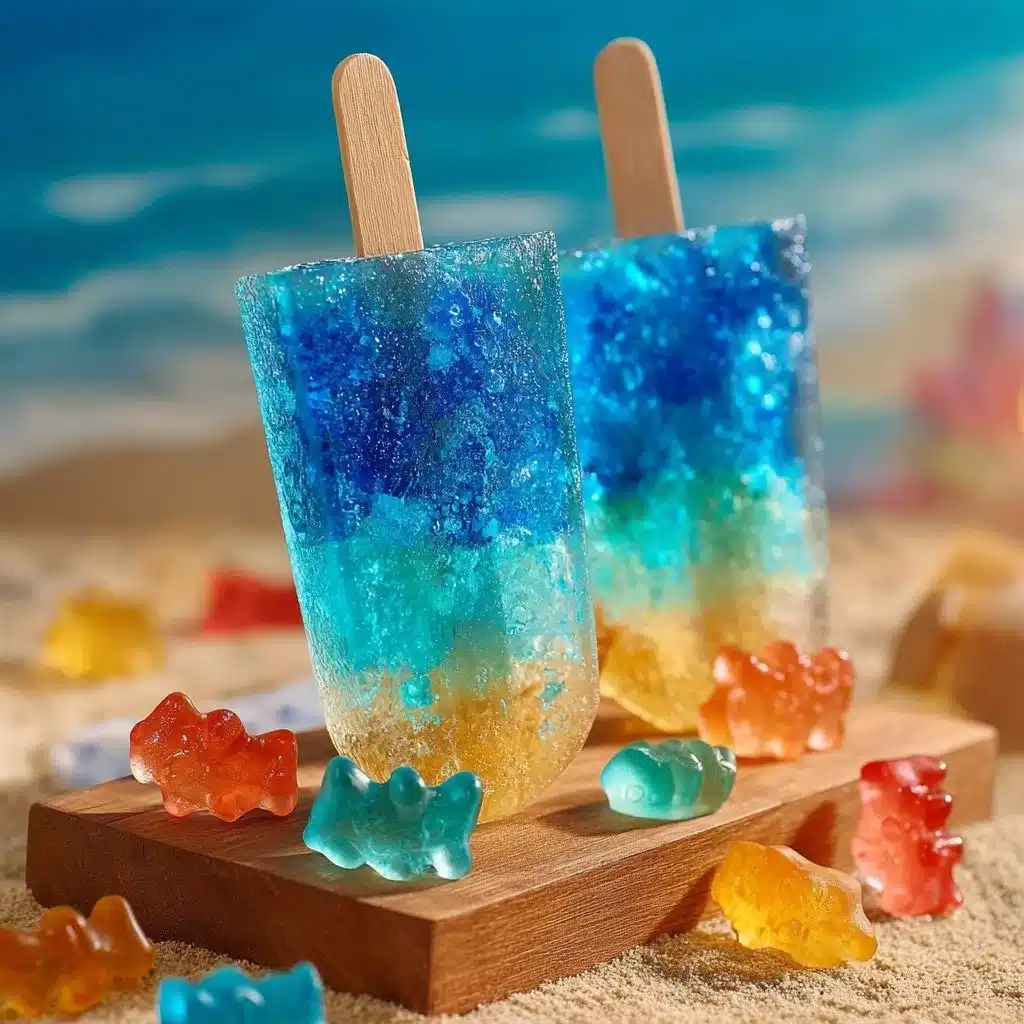
Creating Edible Aquarium Popsicles is not just a delightful culinary adventure; it also provides a unique way to engage children and adults alike. The vibrant colors and fun shapes make these popsicles a perfect treat for hot summer days or themed parties. They are visually appealing, and the combination of blue sports drink or juice with creamy coconut milk creates a delicious flavor profile that’s refreshing and enjoyable. Plus, they’re quite easy to make and can be a lovely project to do with family or friends. These popsicles can also introduce kids to the joy of cooking by allowing them to assist in the process, from pouring to placing the gummy candies. Overall, these Edible Aquarium Popsicles bring a sense of wonder and creativity while being a tasty treat!
how to make Edible Aquarium Popsicles
Making Edible Aquarium Popsicles is straightforward and fun. Here’s a step-by-step guide to help you through the process.
Ingredients:
- 1 cup blue sports drink (or blue juice)
- 1 cup coconut milk
- Gummy fish or sea creature candies
- Ice cube tray or popsicle molds
![image_2]
Directions:
Prepare the Base: Start by pouring the blue sports drink into an ice cube tray. Fill each compartment halfway. This blue layer will be the water in your aquarium popsicles.
Add the Gummies: Take your gummy fish or sea creature candies and place one in each compartment of the ice cube tray. You can position them so they appear to be swimming in the ‘water’ you poured in earlier. This step adds the fun and charm of the aquarium theme.
Freeze the Ice Cubes: Place the ice cube tray in the freezer and let it freeze for about 2 hours, or until solid. Check them after two hours, but don’t worry if you need to leave them for a bit more time – just ensure they are completely frozen.
Prepare the Popsicle Molds: Once the blue ice cubes are frozen, carefully remove them from the tray. You might need to twist the tray a little to release them easily. Then, place the blue ice cubes in popsicle molds, ensuring they are upright.
Add the ‘Ocean’: Pour the coconut milk into the molds around the blue ice cubes. The coconut milk will create a creamy, opaque layer, resembling the ocean surrounding your fish. Fill it to the top, but be careful not to overflow.
Insert the Sticks: Take your popsicle sticks and gently insert them into the molds until they are secured in the center of the coconut milk, resting on top of the blue ice cubes.
Final Freeze: Place the popsicle molds back in the freezer and allow them to freeze completely. This may take another 4-6 hours, so it’s best to leave them overnight for a treat the next day.
Enjoy Your Treat: Once fully frozen, carefully remove the Edible Aquarium Popsicles from the molds. If they stick, you can run a little warm water on the outside of the molds to loosen them. Then, serve them immediately and enjoy the refreshing taste!
how to serve Edible Aquarium Popsicles
Serving Edible Aquarium Popsicles is a delightful experience. You can present them on a colorful serving tray or add some fun, ocean-themed decorations around them for a playful touch. These popsicles are perfect for gatherings, birthday parties, or just a hot summer day in the garden. Consider giving each popsicle its little ocean backdrop by placing them in cups filled with blue-tinted water (using a few drops of food coloring). This will add to the aquarium effect and make for fantastic photos. If you make multiple flavors or colors, you can create a vibrant display that intrigues everyone.
how to store Edible Aquarium Popsicles
Storing your homemade Edible Aquarium Popsicles is simple. After they have fully frozen, ensure they are wrapped well or stored in an airtight container. This prevents freezer burn and helps preserve their delicious taste. If using an ice cube tray, it can be helpful to remove the pops from the molds and place them in a bag or container to save space. They can typically be kept in the freezer for up to 2 months. When you’re ready to enjoy them again, just take them out of the freezer, give them a few minutes to soften a little, and then serve!
tips to make Edible Aquarium Popsicles
Choose the Right Blue: Make sure to use a blue sports drink or blue juice that has a pleasant flavor. The taste of the popsicle will depend on what you choose.
Experiment with Flavors: Instead of coconut milk, try different flavored milks or juices to see what interesting combinations you can create! You could even use almond milk for a nutty twist.
Layering Technique: For a more complex look, you can alternate layers by adding one layer of blue drink, freezing it, then pouring another layer of coconut milk before adding more blue.
Party Fun: These popsicles can be a fun addition to a beach-themed party. You can create a variety of shapes and colors using gelatin and other fun candy.
Gummy Shapes: If you cannot find gummy fish, you can use any candy shaped like sea creatures or even fruit gummies that can add a fun surprise inside.
variation
While the basic Edible Aquarium Popsicles are delightful as they are, you can have fun experimenting with variations. Here are a few ideas:
Different Juices: Instead of blue sports drink, you can use blue raspberry lemonade for a slightly different taste and color.
Fruit Add-ins: Chop up some fresh fruits such as strawberries or blueberries and add them into the coconut milk layer for added flavor and textures.
Flavor Swaps: Swap the coconut milk for yogurt or even flavored sherbet for a different taste experience. This could also add a fruity flavor that enhances the overall popsicle.
Layered Popsicles: Create a layered pop with different colors and flavors while maintaining the aquarium theme. You can use green sports drink, pineapple juice, and coconut milk for a tropical twist.
FAQs
1. Can I use any type of juice for the blue layer?
Yes, you can use any blue juice or sports drink you like. The important part is to choose one that you enjoy drinking!
2. How do I make these popsicles without molds?
If you don’t have popsicle molds, you can use small cups and insert sticks into them once the mixture is partially frozen.
3. Can I add real fish or other edible decorations?
While gummy fish are the safest and most recommended option, you might try adding edible decorations like edible glitter for a sparkly effect, but avoid using real fish as they aren’t suitable for a popsicle recipe.
4. How do I know when they are fully frozen?
The popsicles will be firm to the touch and no longer soft when you push down on them. You can also leave them in the freezer overnight to ensure they are fully set.
5. Are these popsicles suitable for young kids?
Absolutely! Just make sure to monitor small children with gummy candies to avoid choking hazards, and ensure they are old enough to enjoy popsicles safely.
Enjoy the fun of making and eating Edible Aquarium Popsicles, and, who knows, you might even create a new family tradition with this light-hearted treat!
Print
Edible Aquarium Popsicles
- Total Time: 150 minutes
- Yield: 8 servings 1x
- Diet: Vegetarian
Description
Colorful and fun popsicles designed to look like an aquarium, perfect for summer treats.
Ingredients
- 1 cup blue sports drink (or blue juice)
- 1 cup coconut milk
- Gummy fish or sea creature candies
- Ice cube tray or popsicle molds
Instructions
- Prepare the base: Pour the blue sports drink into an ice cube tray, filling each compartment halfway.
- Add the gummies: Place one gummy fish or sea creature in each compartment.
- Freeze the ice cubes: Let the tray freeze for about 2 hours, or until solid.
- Prepare the popsicle molds: Remove the frozen blue cubes and place them in popsicle molds.
- Add the ‘ocean’: Pour coconut milk into the molds around the blue cubes, filling to the top.
- Insert the sticks: Gently insert popsicle sticks into the molds.
- Final freeze: Place molds back in the freezer for another 4-6 hours, best left overnight.
- Enjoy your treat: Remove popsicles from molds and serve immediately.
Notes
Use a blue drink that you enjoy and feel free to experiment with different flavors and combinations!
- Prep Time: 15 minutes
- Cook Time: 0 minutes
- Category: Dessert
- Method: Freezing
- Cuisine: American
Nutrition
- Serving Size: 1 popsicle
- Calories: 120
- Sugar: 20g
- Sodium: 30mg
- Fat: 6g
- Saturated Fat: 5g
- Unsaturated Fat: 1g
- Trans Fat: 0g
- Carbohydrates: 15g
- Fiber: 0g
- Protein: 1g
- Cholesterol: 0mg
Keywords: popsicles, summer treats, kids recipe, aquarium theme, fun food