
Are you tired of serving the same old desserts that leave your guests underwhelmed? Red velvet cookie cups are the perfect solution for anyone looking to add a touch of elegance and flavor to their dessert table. As the creative force behind FoodyDish, I’ve spent countless hours perfecting these versatile treats that combine the rich, velvety texture of red velvet with the fun, customizable nature of cookie cups.
In this guide, I’ll share five incredible ways to transform simple ingredients into showstopping desserts that will have everyone asking for your secret recipe. From preparation tips to serving suggestions and flavor variations, consider this your complete resource for mastering red velvet cookie cups!
Why These Red Velvet Cookie Cups Work
- Uses simple pantry staples you likely already have on hand
- Prep time under 30 minutes with stunning visual results
- Versatile bases that work for casual snacking or elegant entertaining
- Make-ahead friendly for stress-free party planning
- Kid-friendly to make but impressive enough for adult gatherings
Choosing the Right Ingredients for Red Velvet Cookie Cups
Best Quality Components for Perfect Results
The secret to extraordinary red velvet cookie cups begins with selecting the right ingredients. Opt for high-quality cocoa powder (Dutch-processed works best) to achieve that distinctive red velvet flavor. Fresh baking powder and baking soda are non-negotiable for proper rise and texture.
Food Coloring Options
- Gel food coloring: Provides intense color without thinning your batter
- Natural alternatives: Beetroot powder offers a more subtle red hue for health-conscious bakers
- Liquid food coloring: Readily available but may require more to achieve the classic deep red
Substitutions and Alternatives
For those with dietary restrictions, you can easily adapt these red velvet cookie cups. Replace all-purpose flour with a 1:1 gluten-free baking blend, or use plant-based butter and flax eggs for a vegan-friendly version that maintains the rich texture and flavor.
Ingredients & Prep for Red Velvet Cookie Cups
Cookie Cup Base Essentials
- 2½ cups all-purpose flour
- 3 tablespoons unsweetened cocoa powder
- 1 teaspoon baking powder
- ½ teaspoon salt
- 1 cup unsalted butter, softened
- 1½ cups granulated sugar
- 2 large eggs
- 2 teaspoons vanilla extract
- 1-2 tablespoons red food coloring (gel preferred)
- 2 teaspoons white vinegar
Fillings & Toppings Variations
- Classic cream cheese frosting
- White chocolate ganache
- Fresh berries (strawberries, raspberries)
- Crushed Oreo cookies
- Mini chocolate chips
- Sprinkles for decoration
Equipment Needed
A standard muffin tin is essential for shaping your red velvet cookie cups. You’ll also need a small measuring cup or shot glass to create the depression in each cup while they’re still warm.

Step-by-Step Red Velvet Cookie Cups Instructions
Pre-Baking Prep for Red Velvet Cookie Cups
- Preheat your oven to 350°F (175°C) and generously grease a standard 12-cup muffin tin.
- In a medium bowl, whisk together flour, cocoa powder, baking powder, and salt.
- In a separate large bowl, cream butter and sugar until light and fluffy (about 3-4 minutes).
- Beat in eggs one at a time, then add vanilla extract, food coloring, and vinegar.
- Gradually fold in the dry ingredients until just combined. Don’t overmix!
Baking Method for Red Velvet Cookie Cups
- Roll the dough into 2-inch balls (about 2 tablespoons each).
- Place each ball into a muffin cup and press slightly to flatten.
- Bake for 15-18 minutes until the edges are set but the centers still look slightly soft.
- Remove from oven and immediately press the bottom of a measuring cup into each cookie to form a cup shape.
- Let cool in the pan for 5 minutes before carefully removing to a wire rack.
Creating Perfect Cup Shapes
For uniform cups, press the measuring cup gently but firmly into the center of each cookie immediately after removing from the oven. If the depression isn’t deep enough, you can press again after a minute while the cookies are still warm.
Cooling and Storage for Red Velvet Cookie Cups
Allow the cookie cups to cool completely before filling. Store unfilled cups in an airtight container for up to 5 days, or freeze for up to 3 months. Always fill cookie cups just before serving for the best texture and presentation.
Pro Tips for Perfect Red Velvet Cookie Cups
Avoiding Common Mistakes
- Don’t overmix the dough – this can make your cookie cups tough
- Measure flour correctly by spooning into measuring cups and leveling off
- Allow the butter to come to room temperature naturally for proper creaming
- Use room temperature eggs for better incorporation into the batter
Tool Recommendations
A stand mixer makes the creaming process effortless, but a hand mixer works well too. Silicone muffin pans can make removal easier, but metal pans produce better browning on the edges.
Make-Ahead Strategies
Prepare the dough up to 3 days in advance and refrigerate. You can also bake the cups and freeze them unfilled, then thaw at room temperature before filling and serving.
Looking for more delicious dessert ideas? Check out my collection of sweet treats on Pinterest where I share new inspiration daily!
5 Flavor Variations for Red Velvet Cookie Cups
1. Classic Cream Cheese Filled
The traditional pairing that never disappoints. Mix 8 oz softened cream cheese with 1 cup powdered sugar, 1 tsp vanilla extract, and a pinch of salt until smooth. Pipe into cooled cookie cups and garnish with white chocolate shavings.
2. Chocolate Ganache Delight
For chocolate lovers, fill cups with rich ganache made from equal parts heavy cream and semi-sweet chocolate. Top with a fresh raspberry for a pop of color and flavor.
3. Cookies & Cream Dream
Fold crushed Oreo cookies into whipped cream cheese frosting for a cookies and cream variation that kids and adults will fight over.
4. Cheesecake Surprise
Create a no-bake cheesecake filling with cream cheese, sugar, vanilla, and whipped cream. Chill before serving for a refreshing contrast to the cookie cup.
5. Berry Bliss
Fill with mascarpone whipped cream and top with fresh strawberries, blueberries, and a light dusting of powdered sugar for an elegant presentation.
| Variation | Base Filling | Topping | Best Occasion |
|---|---|---|---|
| Classic Cream Cheese | Cream cheese frosting | White chocolate shavings | Any gathering |
| Chocolate Ganache | Dark chocolate ganache | Fresh raspberry | Dinner parties |
| Cookies & Cream | Oreo cream cheese frosting | Oreo crumbs | Kids’ birthdays |
| Cheesecake | No-bake cheesecake filling | Graham cracker crumbs | Summer events |
| Berry Bliss | Mascarpone whipped cream | Fresh berries | Brunch or tea |
Serving Suggestions for Red Velvet Cookie Cups
Create an impressive dessert bar by arranging various filled red velvet cookie cups on a tiered stand. Complement with coffee, tea, or milk for casual gatherings.
For more formal occasions, serve individual cookie cups on small dessert plates with a dollop of whipped cream and a mint leaf. Add a drizzle of chocolate sauce on the plate for an elegant restaurant-style presentation.
These cookie cups also make perfect gifts! Package them in decorative boxes or clear gift bags tied with ribbon for holidays, teacher appreciation, or hostess gifts.
FAQs About Red Velvet Cookie Cups
Can I make these cookie cups ahead of time?
Yes! Bake the cups up to 3 days in advance and store in an airtight container. For best results, fill them just before serving.
Why did my cookie cups crack?
Cracking usually happens if the cups are pressed too soon after baking. Let them cool for 1-2 minutes before forming the depression.
Can I freeze filled cookie cups?
It’s best to freeze the unfilled cups, then thaw and add filling before serving. Most cream cheese-based fillings don’t freeze well.
How do I get that vibrant red color?
Gel food coloring provides the most intense color without affecting the texture. Start with 1 tablespoon and add more if needed.
My cookie cups are too soft. What went wrong?
They may be underbaked. Ensure they have a set edge before removing from the oven, even if the centers still look slightly soft.
Conclusion
Red velvet cookie cups are the perfect blend of impressive presentation and delicious flavor that anyone can master. Whether you’re baking for a special occasion or simply want to elevate your everyday dessert game, these versatile treats deliver consistent wow-factor with minimal effort. The five variations we’ve explored are just the beginning let your creativity guide you to discover even more delicious combinations!
Don’t forget to share your creations with me on social media I love seeing how you put your personal touch on these recipes. And remember, in my kitchen, there are no mistakes, only happy accidents that often lead to the most delicious discoveries. Now, preheat that oven and let’s get baking!
Print
Red Velvet Cookie Cups: 5 Mouthwatering Ways to Indulge
- Total Time: 50 mins
- Yield: 24 mini cookie cups 1x
- Diet: Vegetarian
Description
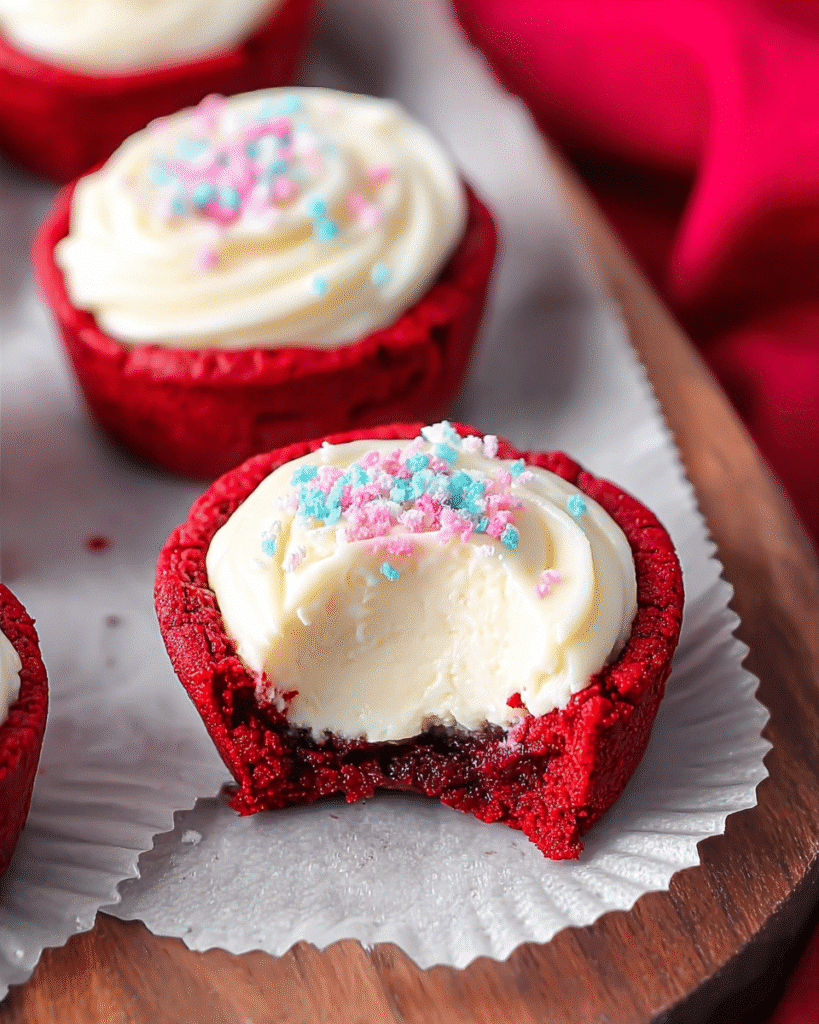
Soft and chewy red velvet cookie cups baked in a muffin tin and filled with a rich, creamy cheesecake-style frosting. These bite-sized treats are perfect for holidays, parties, or anytime you crave a decadent dessert.
Ingredients
2 1/4 cups all-purpose flour
2 tbsp cocoa powder
1 tsp baking soda
1/2 tsp salt
3/4 cup unsalted butter, softened
1 cup granulated sugar
1/2 cup brown sugar
2 large eggs
1 tbsp vanilla extract
1 tbsp red gel food coloring
1 tsp white vinegar
8 oz cream cheese, softened
1/2 cup unsalted butter, softened (for filling)
2 1/2 cups powdered sugar
1 tsp vanilla extract (for filling)
Instructions
1. Preheat oven to 350°F (175°C) and grease a mini muffin tin.
2. In a bowl, whisk together flour, cocoa powder, baking soda, and salt.
3. In a separate bowl, beat butter, granulated sugar, and brown sugar until creamy.
4. Add eggs one at a time, mixing well after each addition.
5. Mix in vanilla, red food coloring, and vinegar.
6. Gradually add dry ingredients to wet ingredients until combined.
7. Scoop dough into muffin tin cavities and bake for 10–12 minutes.
8. Immediately press the center of each cookie gently with the back of a spoon to create a cup shape; cool completely.
9. For the filling, beat cream cheese and butter until smooth.
10. Add powdered sugar and vanilla; beat until fluffy.
11. Pipe filling into cooled cookie cups and refrigerate 20 minutes before serving.
Notes
Do not overbake to keep centers soft and chewy.
Chill filled cookie cups to help the frosting set properly.
Store in the refrigerator for up to 4 days in an airtight container.
Sprinkle with red velvet crumbs or mini chocolate chips for garnish.
- Prep Time: 20 mins
- Cook Time: 12 mins
- Category: Dessert
- Method: Baking
- Cuisine: American
Nutrition
- Serving Size: 1 cookie cup
- Calories: 190
- Sugar: 16g
- Sodium: 120mg
- Fat: 10g
- Saturated Fat: 6g
- Unsaturated Fat: 3g
- Trans Fat: 0g
- Carbohydrates: 23g
- Fiber: 1g
- Protein: 2g
- Cholesterol: 35mg
Keywords: Red Velvet Cookie Cups, red velvet dessert, cream cheese filling, mini cookie cups, party dessert