introduction
If you’re looking for a delicious and easy dessert, this Creamy No-Bake Oreo Cheesecake Cups recipe is perfect for you! This delightful treat combines the rich flavors of Oreo cookies and creamy cheesecake, all layered into handy cups. It’s quick to make and requires no baking, making it an excellent choice for gatherings, parties, or even a casual family dessert. Plus, it’s a great way to impress your friends and family with your culinary skills without spending hours in the kitchen.
why make this recipe
There are many reasons to whip up these Creamy No-Bake Oreo Cheesecake Cups. First, the taste is divine. The combination of crunchy Oreo cookies and silky smooth cheesecake creates a delightful contrast that’s hard to resist.
Second, this recipe is incredibly simple. With just a few ingredients, you can create a dessert that looks and tastes like it took much more time and effort. It’s perfect for beginners or anyone looking to save time in the kitchen.
Lastly, no-bake desserts are ideal for warm weather when you want something sweet but don’t want to heat up the whole kitchen. These cheesecake cups can chill in the fridge, allowing the flavors to meld while you enjoy your day.
how to make Creamy No-Bake Oreo Cheesecake Cups
Making these delightful cheesecake cups is straightforward. It involves mixing, layering, and chilling. Just follow these simple steps, and you’ll have a delicious dessert ready in no time!
Ingredients :
- 1 package Oreo cookies
- 1 cup whipped topping
- 8 oz cream cheese, softened
- 1/2 cup powdered sugar
- 1 tsp vanilla extract
- mini Oreos for garnish
Directions :
Start by crushing the Oreo cookies. You can do this by placing them in a plastic bag and using a rolling pin or simply pulsing them in a food processor. Aim for coarse crumbs; they will form the base of your dessert. Set the crushed cookies aside for later use.
Next, take a mixing bowl and add the softened cream cheese. This step is crucial as it ensures your cream cheese blends smoothly. With an electric mixer or a whisk, blend the cream cheese until it’s creamy and free of lumps.
To the bowl, add the powdered sugar and vanilla extract. Continue to mix until these ingredients are fully incorporated, and the mixture is smooth and luscious. This combination will form the creamy filling of your cheesecake cups.
Now, gently fold in the whipped topping. Use a spatula to combine everything carefully. Folding helps maintain the fluffiness of the whipped topping, giving your cheesecake cups a light texture.
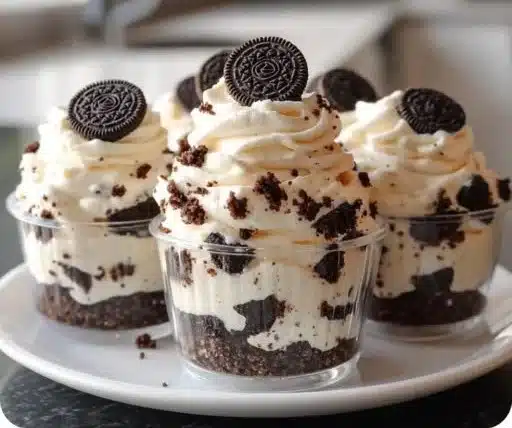
It’s time to layer the dessert! Take serving cups and begin by adding a layer of the crushed Oreo cookies at the bottom of each cup. This layer creates a delightful crunch.
After the cookie layer, add a layer of the cream cheese mixture on top. The amount you use is up to you, but make sure to divide it evenly among the cups to keep everything balanced.
Repeat the layering process until the cups are filled. Start with the cookie layer, followed by the cream cheese layer, and keep going until you reach the top of the cup.
For the finishing touches, dollop some extra whipped topping on top of each cup. Garnish with a mini Oreo on top to add a decorative touch and a fun element.
Finally, place the cups in the refrigerator. Allow them to chill for at least two hours before serving. This chilling time aids in setting the cheesecake and allows the flavors to meld perfectly.
how to serve Creamy No-Bake Oreo Cheesecake Cups
When it comes to serving your Creamy No-Bake Oreo Cheesecake Cups, it’s all about presentation and convenience. Since they are already in individual cups, serving is simple! Just take them out of the refrigerator, and you’re ready to go.
You can place the cups on a platter for a beautiful display. If you’re serving them at a party, you might consider providing spoons or small forks to make it easier for guests to dig in. Don’t forget to keep them chilled until serving to maintain their creamy texture.
how to store Creamy No-Bake Oreo Cheesecake Cups
To store your Creamy No-Bake Oreo Cheesecake Cups, keep them in the refrigerator. Use a lid or plastic wrap to cover the cups to help them stay fresh. They can last in the fridge for up to three days. If you want to make them ahead of time, they store well in the fridge, making them great for meal prepping desserts.
Avoid freezing these cups; the texture may become compromised, especially the whipped topping. Enjoy them fresh for the best taste and consistency!
tips to make Creamy No-Bake Oreo Cheesecake Cups
Soften Your Cream Cheese: Make sure your cream cheese is softened before you begin mixing. If you forget to take it out of the fridge, you can soften it in the microwave. Just be careful not to melt it!
Use Real Whipped Cream: If you prefer a homemade touch, you can whip your cream instead of using store-bought whipped topping. It will add a fresher taste and can be sweetened to your liking.
Adjust Sweetness: If you find that the filling isn’t sweet enough for your taste, feel free to add a bit more powdered sugar. Taste as you go to get it just right.
Experiment With Layers: You can play around with the layers based on your preference. Some may prefer more cookie layers, while others might love extra creamy filling. The choice is yours!
Decorate Creatively: Besides mini Oreos, consider using chocolate shavings, sprinkles, or even berries as toppings for added flair and flavor.
variation
Feel free to switch things up with different flavor variations of these cheesecake cups. For example, you can use other types of cookies instead of Oreos to change the flavor profile.
- Chocolate Chip Cookie Dough: Substitute the Oreos with chocolate chip cookies for a different twist.
- Peanut Butter Oreo Cheesecake Cups: Add peanut butter to the cream cheese mixture for a nutty flavor.
- Mint Chocolate Cheesecake Cups: Use mint Oreos instead and add a bit of peppermint extract for a refreshing variation.
- Fruit Topped Cheesecake Cups: Top with a layer of your favorite fruit, like strawberries or raspberries, for a fruity twist.
FAQs
Can I make these cheesecake cups in advance?
Yes, these cups can be made a few days in advance. Just be sure to store them in the refrigerator until you’re ready to serve.What if I don’t have whipped topping?
If you don’t have whipped topping, you can make your own by whipping heavy cream with a bit of sugar until soft peaks form.Can these cups be frozen?
It’s best to avoid freezing these cups as the texture can change when thawed. They are best enjoyed fresh from the fridge.How many servings does this recipe make?
This recipe typically makes about 4 to 6 servings, depending on the size of your cups.Can I use any type of cream cheese?
Full-fat cream cheese yields the best results, but you can use reduced-fat if you wish. Just remember that the texture and richness might not be the same.
These Creamy No-Bake Oreo Cheesecake Cups are not only delicious but also so easy to make that they will become your go-to dessert recipe. Enjoy creating these delightful cups and watch them disappear at your next gathering!
Print
Creamy No-Bake Oreo Cheesecake Cups
- Total Time: 120 minutes
- Yield: 6 servings 1x
- Diet: Vegetarian
Description
Delicious and easy no-bake Oreo cheesecake cups, perfect for gatherings and warm weather.
Ingredients
- 1 package Oreo cookies
- 1 cup whipped topping
- 8 oz cream cheese, softened
- 1/2 cup powdered sugar
- 1 tsp vanilla extract
- mini Oreos for garnish
Instructions
- Start by crushing the Oreo cookies into coarse crumbs.
- Take a mixing bowl and add the softened cream cheese, blending until creamy.
- Add the powdered sugar and vanilla extract, mixing until smooth.
- Gently fold in the whipped topping for a light texture.
- Layer the crushed Oreo cookies at the bottom of each serving cup.
- Add a layer of the cream cheese mixture on top of the cookie layer.
- Repeat the layering process until the cups are filled.
- Finish with dollops of whipped topping and garnish with mini Oreos.
- Chill in the refrigerator for at least two hours before serving.
Notes
These cups can be stored in the refrigerator for up to three days. Avoid freezing to maintain texture.
- Prep Time: 15 minutes
- Cook Time: 0 minutes
- Category: Dessert
- Method: No-Bake
- Cuisine: American
Nutrition
- Serving Size: 1 cup
- Calories: 300
- Sugar: 20g
- Sodium: 300mg
- Fat: 15g
- Saturated Fat: 7g
- Unsaturated Fat: 5g
- Trans Fat: 0g
- Carbohydrates: 30g
- Fiber: 1g
- Protein: 3g
- Cholesterol: 30mg
Keywords: oreo, cheesecake, no-bake dessert, easy dessert, summer dessert